ImageMosaic example with Modis COG datasets
Introduction
This tutorial provide some hints on configuring an ImageMosaic on top of some MODIS Vegetation Index datasets available at NASA EarthData
ImageMosaic Configuration files
We need a couple of configuration files to have an ImageMosaic properly set. Configuration is based on these key points:
The ImageMosaic will be initially created empty without any data. Data will be harvested as a second step.
A Time dimension will be used, based on the date contained in the file’s name.
More details on ImageMosaic configuration are available on the dedicated documentation section: ImageMosaic configuration
Based on the above key points, we can setup the following configuration files:
indexer.properties:
This contains the main configuration to index the datasets composing the ImageMosaic.
Cog=true
PropertyCollectors=TimestampFileNameExtractorSPI[timeregex](time)
TimeAttribute=time
Schema=*the_geom:Polygon,location:String,time:java.util.Date
CanBeEmpty=true
Name=modisvi
Relevant parts:
Cog flag specifying that the ImageMosaic is a Mosaic of COG Datasets
PropertyCollectors, TimeAttribute and Schema are used to define the ImageMosaic index columns and how to populate them
CanBeEmpty allows to define an empty ImageMosaic. It will be populated afterwards
Name is the name for this mosaic
timeregex.properties:
The previous indexer refers to a time dimension and the related time column in the index’s schema that will get populated by extracting the time value from the filename (the 8 digits, representing YEAR, MONTH, DAY) using the regex specified in the timeregex.properties file. An example of sample file for this collection as stored on the S3 bucket is 2018.01.01.tif so the time regex will reflect that. Note the 3 groups of digits and the ‘format’ of the date.
regex=[0-9]{4}.[0-9]{2}.[0-9]{2},format=yyyy.MM.dd
datastore.properties:
Due to the amount of available datasets, storing the ImageMosaic index on a DBMS is recommended, i.e. a PostGIS DB. See datastore.properties section of the ImageMosaic documentation for more info. Make sure that a DB with the name reported in the datastore is available
user=postgres
port=5432
passwd=postgres
url=jdbc\:postgresql\:modisvi
host=localhost
database=modisvi
driver=org.postgresql.Driver
schema=public
SPI=org.geotools.data.postgis.PostgisNGDataStoreFactory
fetch\ size=1000
max\ connections=20
min\ connections=5
validate\ connections=true
Loose\ bbox=true
Expose\ primary\ key=false
Max\ open\ prepared\ statements=50
preparedStatements=false
Estimated\ extends=false
Connection\ timeout=20
Once the 3 files have been setup, create a zip archive with them and let’s name it modisvi.zip. (Note that the files need to be in the root of the zip files, not into a subdirectory)
You are now ready to use REST calls to start the ImageMosaic creation.
ImageMosaic REST operations
On the next steps we assume:
An existing GeoServer instance is running on port 8080 of localhost.
A workspace named “test” exists on that GeoServer.
REST credentials are user=admin password=geoserver.
A default aws region is defined on JAVA System Property, using the flag -Diio.https.aws.region=us-west-2.
Make sure to update the incoming URLs accordingly, based on your actual installation.
Create an empty ImageMosaic without configuring it
curl request
curl -u admin:geoserver -XPUT --write-out %{http_code} -H "Content-type:application/zip" --data-binary @modisvi.zip http://localhost:8080/geoserver/rest/workspaces/test/coveragestores/modisvi/file.imagemosaic?configure=none
Response
201 OK
Providing sample prototyping granules
Next step is providing a prototype dataset for the coverage to be supported.
curl request
curl -u admin:geoserver -XPOST -H "Content-type: text/plain" --write-out %{http_code} -d "https://modis-vi-nasa.s3-us-west-2.amazonaws.com/MOD13A1.006/2018.01.01.tif" "http://localhost:8080/geoserver/rest/workspaces/test/coveragestores/modisvi/remote.imagemosaic"
Response
202 Accepted
Initializing the store (Listing available coverages)
Once a prototype has been provided we need to initialize the store by querying it for the available coverages.
curl request
curl -v -u admin:geoserver -XGET http://localhost:8080/geoserver/rest/workspaces/test/coveragestores/modisvi/coverages.xml?list=all
Response
<List>
  <coverageName>modisvi</coverageName>
</list>
Configuring the coverage
Once we get the list of available coverages, we need to configure a coverage by sending the config through REST.
curl request
curl -v -u admin:geoserver -XPOST -H "Content-type: text/xml" -d @"coverage.xml" "http://localhost:8080/geoserver/rest/workspaces/test/coveragestores/modisvi/coverages"
where coverage.xml has this content:
<coverage>
  <name>modisvi</name>
  <nativeName>modisvi</nativeName>
  <enabled>true</enabled>
  <metadata>
    <entry key="time">
      <dimensionInfo>
        <enabled>true</enabled>
        <presentation>LIST</presentation>
        <units>ISO8601</units>
        <defaultValue>
          <strategy>MAXIMUM</strategy>
        </defaultValue>
      </dimensionInfo>
    </entry>
  </metadata>
</coverage>
Adding more granules
Now that we have a coverageStore ready and a coverage layer configured we can start adding more granules.
curl request
curl -u admin:geoserver -XPOST -H "Content-type: text/plain" --write-out %{http_code} -d "https://modis-vi-nasa.s3-us-west-2.amazonaws.com/MOD13A1.006/2018.01.17.tif" "http://localhost:8080/geoserver/rest/workspaces/test/coveragestores/modisvi/remote.imagemosaic"
Setting Style
That MODIS data has 2 bands representing (Normalized Difference Vegetation Index) (NDVI) and Enhanced Vegetation Index (EVI). Let’s add this ndvi.sld style to apply a proper colormap to the NDVI band (copy this content to a file named ndvi.sld to be used by the next REST call):
<StyledLayerDescriptor xmlns="http://www.opengis.net/sld" xmlns:sld="http://www.opengis.net/sld" xmlns:gml="http://www.opengis.net/gml" xmlns:ogc="http://www.opengis.net/ogc" version="1.0.0">
  <NamedLayer>
    <Name>Default Styler</Name>
    <UserStyle>
      <Name>ndvi</Name>
      <Title>ndvi</Title>
      <FeatureTypeStyle>
        <Name>name</Name>
        <Rule>
          <RasterSymbolizer>
            <ChannelSelection>
              <GrayChannel>
                <SourceChannelName>1</SourceChannelName>
              </GrayChannel>
            </ChannelSelection>
            <ColorMap>
              <ColorMapEntry color="#000000" quantity="-1"/>
              <ColorMapEntry color="#0000ff" quantity="-0.75"/>
              <ColorMapEntry color="#ff00ff" quantity="-0.25"/>
              <ColorMapEntry color="#ff0000" quantity="0"/>
              <ColorMapEntry color="#ffff00" quantity="0.5"/>
              <ColorMapEntry color="#00ff00" quantity="1"/>
            </ColorMap>
            <ContrastEnhancement/>
          </RasterSymbolizer>
        </Rule>
      </FeatureTypeStyle>
    </UserStyle>
  </NamedLayer>
</StyledLayerDescriptor>
curl request to create the style
curl -v -u admin:geoserver -XPOST -H "Content-type: application/vnd.ogc.sld+xml" -d @ndvi.sld http://localhost:8080/geoserver/rest/styles
curl request to set the style as default style of the layer
curl -v -u admin:geoserver -XPUT -H "Content-type: text/xml" -d "<layer><defaultStyle><name>ndvi</name></defaultStyle></layer>" http://localhost:8080/geoserver/rest/layers/modisvi.xml
Final preview
This is how a layer preview will looks like:
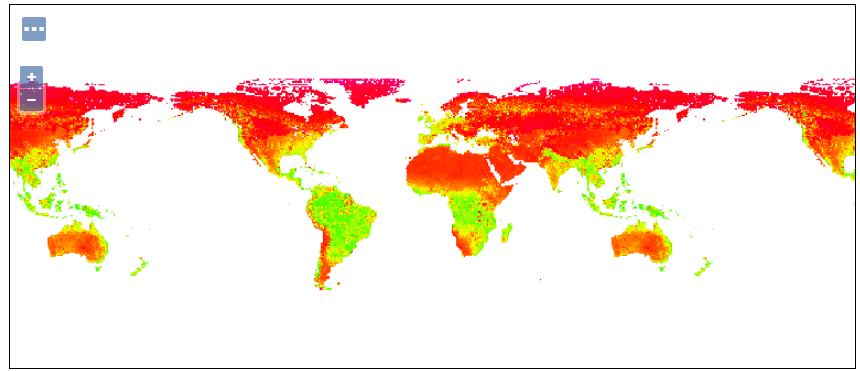
NDVI COG dataset