3.1. CSS Quickstart
In the last section, we saw how the OGC defines style using XML documents (called SLD files).
We will now explore GeoServer styling in greater detail using a tool to generate our SLD files. The Cascading Style Sheet (CSS) GeoServer extension is used to generate SLD files using a syntax more familiar to web developers.
Using the CSS extension to define styles results in shorter examples that are easier to understand. At any point we will be able to review the generated SLD file.
3.1.1. Syntax
This section provides a quick introduction to CSS syntax for mapping professionals who may not be familiar with web design.
3.1.1.1. Key properties
As we work through CSS styling examples you will note the use of key properties. These properties are required to trigger the creation of an appropriate symbolizer in SLD.
stroke |
Color (or graphic) for LineString or Polygon border |
fill |
Color (or graphic) for Polygon Fill |
mark |
Well-known Mark or graphic used for Point |
label |
Text expression labeling |
halo-radius |
Size of halo used to outline label |
Using just these key properties and the selector *, you will be able to visualize vector data.
For example, here is the key property stroke providing a gray representation for line or polygon data:
* {
   stroke: gray;
}
Here is the key property fill providing a blue fill for polygon data:
* {
   fill: #2020ED;
}
Here is the key property mark showing the use of the well-known symbol square:
* {
   mark: symbol(square);
}
Here is the key property label generating labels using the CITY_NAME feature attribute:
* {
   label: [CITY_NAME];
}
Here is the key property halo-radius providing an outline around generated label:
* {
   label: [NAME];
   halo-radius: 1;
}
Reference:
3.1.1.2. Rules
We have already seen a CSS style composed of a single rule:
* {
  mark: symbol(circle);
}
We can also make a rule that only applies to a specific FeatureType:
populated_places {
  mark: symbol(triangle);
}
We can make a style consisting of more than one rule, carefully choosing the selector for each rule. In this case we are using a selector to style capital cities with a star, and non-capital with a circle:
[ FEATURECLA = 'Admin-0 capital' ] {
  mark: symbol(star);
  mark-size: 6px;
}

[ FEATURECLA <> 'Admin-0 capital' ] {
  mark: symbol(circle);
  mark-size: 6px;
}
The feature attribute test performed above uses Constraint Query Language (CQL). This syntax can be used to define filters to select content, similar to how the SQL WHERE statement is used. It can also be used to define expressions to access attribute values allowing their use when defining style properties.
Rule selectors can also be triggered based on the state of the rendering engine. In this example we are only applying labels when zoomed in:
[@scale < 20000000] {
   label: [ NAME ];
}
In the above example the label is defined using the CQL Expression NAME. This results in a dynamic style that generates each label on a case-by-case basis, filling in the label with the feature attribute NAME.
Reference:
3.1.1.3. Cascading
In the above example feature attribute selection we repeated information. An alternate approach is to make use of CSS Cascading and factor out common properties into a general rule:
[ FEATURECLA = 'Admin-0 capital' ] {
  mark: symbol(star);
}

[ FEATURECLA <> 'Admin-0 capital' ] {
  mark: symbol(circle);
}

* {
  mark-size: 6px;
}
3.1.1.4. Pseudo-selector
Up to this point we have been styling individual features, documenting how each shape is represented.
When a shape is represented using a symbol, we have a second challenge: documenting the colors and appearance of the symbol. The CSS extension provides a pseudo-selector allowing further properties to be applied to a symbol.
Example of using a pseudo-selector:
* {
  mark: symbol(circle);
}

:mark {
  fill: black;
  stroke: white;
}
In this example the :mark pseudo-selector is used select the circle mark, and provides a fill and stroke for use when rendering.
Pseudo-selector |
Use of symbol |
|---|---|
:mark |
point markers |
:stroke |
stroke patterns |
:fill |
fill patterns |
:shield |
label shield |
:symbol |
any use |
The above pseudo-selectors apply to all symbols, but to be specific the syntax nth-symbol(1) can be used:
* {
  mark: symbol(circle);
}

:nth-mark(1) {
  fill: black;
  stroke: white;
}
Reference:
Styled Marks (User Guide)
3.1.2. Compare CSS to SLD
The CSS extension is built with the same GeoServer rendering engine in mind, providing access to all the functionality of SLD (along with vendor options for fine control of labeling). The two approaches use slightly different terminology: SLD uses terms familiar to mapping professionals, CSS uses ideas familiar to web developers.
3.1.2.1. SLD Style
SLD makes use of a series of Rules to select content for display. Content is selected using filters that support attribute, spatial and temporal queries.
Once selected, content is transformed into a shape and drawn using symbolizers. Symbolizers are configured using CSS Properties to document settings such as “fill” and “opacity”.
Content can be drawn by more than one rule, allowing for a range of effects.
Here is an example SLD file for reference:
<?xml version="1.0" encoding="ISO-8859-1"?>
<StyledLayerDescriptor version="1.0.0"
 xsi:schemaLocation="http://www.opengis.net/sld StyledLayerDescriptor.xsd"
 xmlns="http://www.opengis.net/sld"
 xmlns:ogc="http://www.opengis.net/ogc"
 xmlns:xlink="http://www.w3.org/1999/xlink"
 xmlns:xsi="http://www.w3.org/2001/XMLSchema-instance">
  <NamedLayer>
    <Name>airports</Name>
    <UserStyle>
      <Title>Airports</Title>
      <FeatureTypeStyle>
        <Rule>
          <Name>airports</Name>
          <Title>Airports</Title>
            <PointSymbolizer>
              <Graphic>
                <ExternalGraphic>
                  <OnlineResource xlink:type="simple"
                  xlink:href="airport.svg" />
                  <Format>image/svg</Format>
                </ExternalGraphic>
                <ExternalGraphic>
                  <OnlineResource xlink:type="simple"
                  xlink:href="airport.png" />
                  <Format>image/png</Format>
                </ExternalGraphic>
                <Mark>
                  <WellKnownName>triangle</WellKnownName>
                  <Fill>
                    <CssParameter name="fill">#000000</CssParameter>
                  </Fill>
                  <Stroke>
                    <CssParameter name="stroke">#FFFFFF</CssParameter>
                    <CssParameter name="stroke-opacity">0.50</CssParameter>
                  </Stroke>
                </Mark>
              <Size>16</Size>
            </Graphic>
          </PointSymbolizer>
        </Rule>
      </FeatureTypeStyle>
    </UserStyle>
  </NamedLayer>
</StyledLayerDescriptor>
3.1.2.2. CSS Style
CSS also makes use of rules, each rule making use of selectors to shortlist content for display. Each selector uses a CQL filter that supports attribute, spatial and temporal queries. Once selected, CSS Properties are used to describe how content is rendered.
Content is not drawn by more than one rule. When content satisfies the conditions of more than one rule the resulting properties are combined using a process called inheritance. This technique of having a generic rule that is refined for specific cases is where the Cascading in Cascading Style Sheet comes from.
Here is an example using CSS:
* {
  mark: url(airport.svg);
  mark-mime: "image/svg";
}
In this rule the selector * is used to match all content. The rule defines properties indicating how this content is to be styled. The property mark is used to indicate we want this content drawn as a Point. The value url(airport.svg) is a URL reference to the image file used to represent each point. The mark-mime property indicates the expected format of this image file.
3.1.3. Tour
To confirm everything works, let’s reproduce the airports style above.
Navigate to the Styles page.
Each time we edit a style, the contents of the associated SLD file are replaced. Rather than disrupt any of our existing styles we will create a new style. Click Add a new style and choose the following:
Name:
airport0
Workspace:
(none specified)
Format:
CSS
Replace the initial YSLD definition with our airport CSS example and click Apply:
* {
  mark: url(airport.svg);
  mark-mime: "image/svg";
}
Click the Layer Preview tab to preview the style. We want to preview on the airports layer, so click the name of the current layer and select ne:airports from the list that appears. You can use the mouse buttons to pan and scroll wheel to change scale.
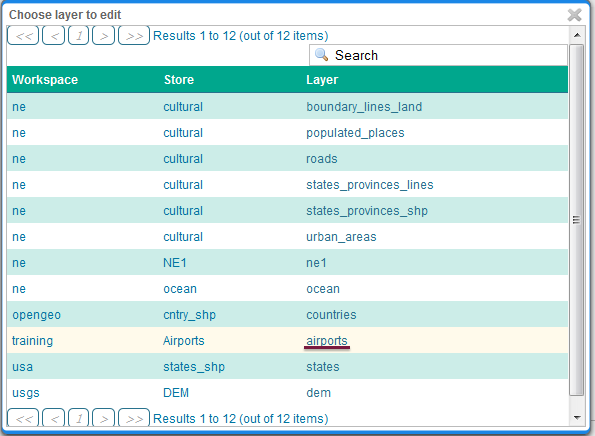
Choosing the airports layer
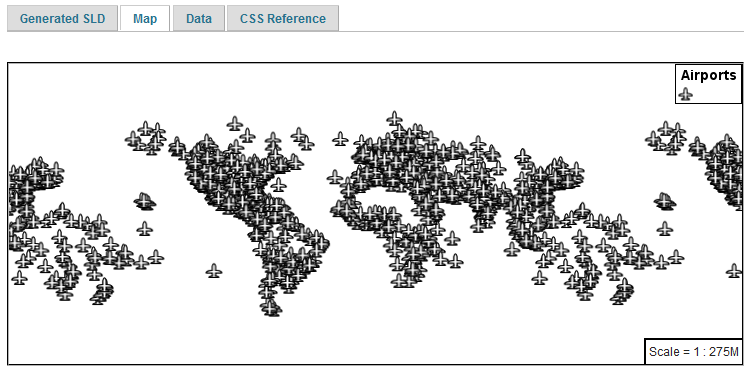
Layer preview
Click Layer Data for a summary of the selected data.
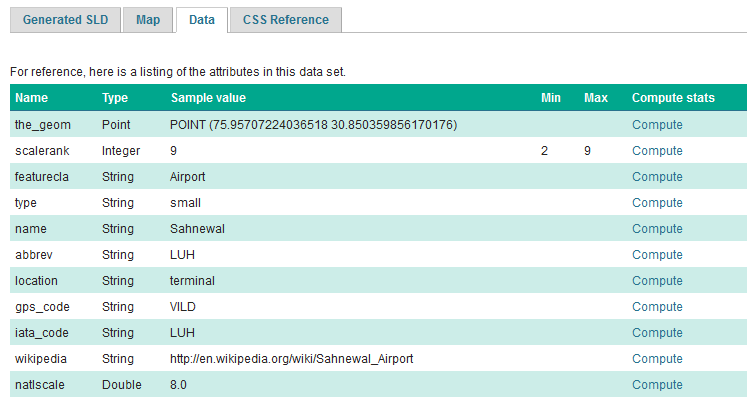
Layer attributes
3.1.4. Bonus
Finished early? For now please help your neighbour so we can proceed with the workshop.
If you are really stuck please consider the following challenge rather than skipping ahead.
3.1.4.1. Explore Data
Return to the Data tab and use the Compute link to determine the minimum and maximum for the scalerank attribute.
3.1.4.2. Challenge Compare SLD Generation
# The rest API can be used to review your CSS file directly.
Browser:
Command line:
curl -v -u admin:geoserver -XGET http://localhost:8080/geoserver/rest/styles/airports0.css
The REST API can also be used generate an SLD file:
Browser:
Command line:
curl -v -u admin:geoserver -XGET http://localhost:8080/geoserver/rest/styles/airports0.sld?pretty=true
Compare the generated SLD differ above with the handwritten
SLD fileused as an example?Challenge: What differences can you spot?
Instructor Notes
Generated SLD does not include name or title information; this can be added by students using an annotation. Encourage students to look this up in the reference material provided.
The second difference is with the use of a fallback Mark when defining a PointSymbolizer. The CSS extension does not bother with a fallback as it knows the capabilities of the GeoServer rendering engine (and is not trying to create a reusable style).