This section describes how to implement a WPS process for use in GeoServer.
It demonstrates the development artifacts and build steps
necessary to create a WPS process, deploy it in GeoServer,
and test it.
The example process used is a simple “Hello World” process
which accepts a single input parameter and returns a single text output.
Before starting, GeoServer must be built on the local system. See
the Source Code and Quickstart sections for details.
GeoServer must be built with WPS support as described in the
Maven Guide section.
Specifically, make sure GeoServer is built using the -Pwps profile.
Alternatively, the custom WPS plug-in can be deployed into an existing GeoServer
instance (which must have the WPS extension installed).
To create a new WPS process plug-in module the first step is to create a Maven project.
For this example the project will be called “hello_wps”.
Create a new directory named hello_wps somewhere on the file system.
Add the following pom.xml to the root of the new module in the hello_wps directory:
<projectxmlns="http://maven.apache.org/POM/4.0.0"xmlns:xsi="http://www.w3.org/2001/XMLSchema-instance"xsi:schemaLocation="http://maven.apache.org/POM/4.0.0 http://maven.apache.org/maven-v4_0_0.xsd "><modelVersion>4.0.0</modelVersion><groupId>org.geoserver</groupId><artifactId>hello_wps</artifactId><packaging>jar</packaging><version>2.28-SNAPSHOT</version><name>hello_wps</name><properties><project.build.sourceEncoding>UTF-8</project.build.sourceEncoding><gt.version>34-SNAPSHOT</gt.version><!-- change to GeoTools version --><gs.version>2.28-SNAPSHOT</gs.version><!-- change to GeoServer version --></properties><dependencyManagement><dependencies><!-- Import the GeoTools BOM --><dependency><groupId>org.geotools</groupId><artifactId>gt-bom</artifactId><version>${gt.version}</version><type>pom</type><scope>import</scope></dependency></dependencies></dependencyManagement><dependencies><dependency><groupId>org.geotools</groupId><artifactId>gt-process</artifactId></dependency><dependency><groupId>org.geoserver.extension</groupId><artifactId>gs-wps-core</artifactId><version>${gs.version}</version></dependency><dependency><groupId>org.geoserver</groupId><artifactId>gs-main</artifactId><version>${gs.version}</version><classifier>tests</classifier><scope>test</scope></dependency><dependency><groupId>junit</groupId><artifactId>junit</artifactId><version>4.11</version><scope>test</scope></dependency><dependency><groupId>com.mockrunner</groupId><artifactId>mockrunner</artifactId><version>0.3.6</version><scope>test</scope></dependency></dependencies><build><plugins><plugin><artifactId>maven-compiler-plugin</artifactId><configuration><source>1.8</source><target>1.8</target></configuration></plugin></plugins></build><repositories><repository><releases><enabled>true</enabled></releases><snapshots><enabled>false</enabled></snapshots><id>osgeo-releases</id><name>OSGeoNexusReleaseRepository</name><url>https://repo.osgeo.org/repository/release/</url></repository><repository><releases><enabled>false</enabled></releases><snapshots><enabled>true</enabled></snapshots><id>osgeo-snapshots</id><name>OSGeoNexusSnapshotRepository</name><url>https://repo.osgeo.org/repository/snapshot/</url></repository></repositories></project>
Create the directory src/main/java under the root of the new module:
[hello_wps]%mkdir-psrc/main/java
The project should now have the following structure:
Create the Java class that implements the custom WPS process.
Create a Java class called HelloWPS.java inside the created package (make sure you are in the ‘src/main/java’ folder and not in the ‘src/test/java’ folder):
packageorg.geoserver.hello.wps;importorg.geotools.process.factory.DescribeParameter;importorg.geotools.process.factory.DescribeProcess;importorg.geotools.process.factory.DescribeResult;importorg.geoserver.wps.gs.GeoServerProcess;@DescribeProcess(title="helloWPS",description="Hello WPS Sample")publicclassHelloWPSimplementsGeoServerProcess{@DescribeResult(name="result",description="output result")publicStringexecute(@DescribeParameter(name="name",description="name to return")Stringname){return"Hello, "+name;}}
GeoServer uses the Spring Framework to manage
instantiation of components. This mechanism is used to register the process with GeoServer when it
starts, which will make it discoverable via the WPS service interface.
Create a directory src/main/resources under the root of the new module:
[hello_wps]%mkdir-psrc/main/resources
The project should now have the following directory structure:
hello_wps/+pom.xml+src/+main/+java/+resources/
Create an applicationContext.xml in the src/main/resources directory with the following contents:
<?xml version="1.0" encoding="UTF-8"?><!DOCTYPE beans PUBLIC "-//SPRING//DTD BEAN//EN" "http://www.springframework.org/dtd/spring-beans.dtd"><beans><beanid="helloWPS"class="org.geoserver.hello.wps.HelloWPS"/></beans>
Note
A process registered in the GeoServer spring context will be assigned to the “gs”
process namespace.
To build the custom process, run the following command from the root of the project:
mvn clean install
This cleans the build area, compiles the code, and creates a JAR file in the target directory.
The JAR file name is determined by the name and version given to the project in the pom.xml file.
(for this example it is hello_wps-2.6-SNAPSHOT.jar).
To deploy the process module, copy this JAR file into the /WEB-INF/lib directory of GeoServer and then restart the instance.
Note
For alternative deployment options (i.e. running from source), see the Trying it out
section inside Implementing a simple OWS service
You can verify that the new process was deployed successfully by using
the WPS Request Builder. The WPS Request Builder is a utility that allows invoking WPS processes
through the GeoServer UI. Access this utility by navigating to the WPS Request Builder in the Demos
section of the GeoServer Web Admin Interface.
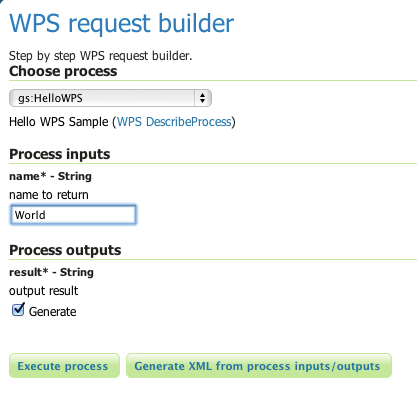
In the WPS Request Builder select the process called gs:helloWPS from the Choose process dropdown.
The request builder displays an interface which allows calling the process, based on the
parameters and outputs described in the capabilities of the process
(which are defined by the process class annotations).
The following image shows the WPS Request Builder running the gs:helloWPS process.
Enter the desired parameter and click on Execute process to run it. A window with the expected result should appear.
WPS Request Builder, showing gs:HelloWPS process parameters
The basic GeoServer WPS architecture is meant to offload and centralize input decoding and output encoding, leaving
the processes to work against Java objects, and automatically creating new input and output types for all processes
as soon as a new matching PPIO is registered.
It is however also possible to leave the process to accept both raw inputs and outputs, and do the parsing encoding itself.
This suits well binding to external network or command line tools that are already doing parsing and encoding as their
normal activities.
Raw inputs and outputs are represented by the RawData interface:
publicinterfaceRawData{/** * Returns the mime type of the stream's contents * * @return */publicStringgetMimeType();/** * Gives access to the raw data contents. * * @return * @throws FileNotFoundException */publicInputStreamgetInputStream()throwsIOException;/** * Optional field for output raw data, used by * WPS to generate a file extension * * @return */publicStringgetFileExtension();}
As an input, the RawData will be provided to the process, that will discover the mimeType chosen by the user,
and will get access to the raw input stream of the data.
As an output, the process will return a RawData and the WPS will see what mimeType the result will be in, get access
to the raw contents, and grab a file extension to build file names for the user file downloads.
The process using RawData will also have to provide some extra metadata in the annotations, in order to declare
which mime types are supported and to allow the process to know which output mime types were chosen in the Execute request.
The extra annotations mimeTypes and chosenMimeType are placed in the meta section of the result and parameter annotations:
The above instructs GeoServer WPS about raw data handling:
The result output can be returned in application/json or text/xml, with application/json as the default one
The mime type chosen by the user for the output will be provided to the process as the outputMimeType parameter (and this parameter will be
hidden from the DescribeProcess output)
The input parameter will be advertised as supporting the text/plain mime type
In terms of building a RawData, the process is free to create its own class if needed,
or it can use one of the existing FileRawData, StringRawData, StreamRawData implementations.