教程: 使用 CSS 样式化数据
本教程将展示如何使用 CSS 来设置图层的样式,以及等效的 SLD 代码。
要使用本教程,你需要 CSS 扩展 以及来自 默认 GeoServer 配置 的 states 图层.
为 states 图层创建样式
默认 states 图层的 SLD 文件看起来像这样:
<?xml version="1.0" encoding="ISO-8859-1"?>
<StyledLayerDescriptor
version="1.0.0"
xmlns="http://www.opengis.net/sld"
xmlns:ogc="http://www.opengis.net/ogc"
xmlns:xlink="http://www.w3.org/1999/xlink"
xmlns:xsi="http://www.w3.org/2001/XMLSchema-instance"
xmlns:gml="http://www.opengis.net/gml"
xsi:schemaLocation="http://www.opengis.net/sld
http://schemas.opengis.net/sld/1.0.0/StyledLayerDescriptor.xsd
">
<NamedLayer>
<Name>USA states population</Name>
<UserStyle>
<Name>population</Name>
<Title>Population in the United States</Title>
<Abstract>A sample filter that filters the United States into three
categories of population, drawn in different colors</Abstract>
<FeatureTypeStyle>
<Rule>
<Title>< 2M</Title>
<ogc:Filter>
<ogc:PropertyIsLessThan>
<ogc:PropertyName>PERSONS</ogc:PropertyName>
<ogc:Literal>2000000</ogc:Literal>
</ogc:PropertyIsLessThan>
</ogc:Filter>
<PolygonSymbolizer>
<Fill>
<!-- CssParameters allowed are fill (the color) and fill-opacity -->
<CssParameter name="fill">#4DFF4D</CssParameter>
<CssParameter name="fill-opacity">0.7</CssParameter>
</Fill>
</PolygonSymbolizer>
</Rule>
<Rule>
<Title>2M - 4M</Title>
<ogc:Filter>
<ogc:PropertyIsBetween>
<ogc:PropertyName>PERSONS</ogc:PropertyName>
<ogc:LowerBoundary>
<ogc:Literal>2000000</ogc:Literal>
</ogc:LowerBoundary>
<ogc:UpperBoundary>
<ogc:Literal>4000000</ogc:Literal>
</ogc:UpperBoundary>
</ogc:PropertyIsBetween>
</ogc:Filter>
<PolygonSymbolizer>
<Fill>
<!-- CssParameters allowed are fill (the color) and fill-opacity -->
<CssParameter name="fill">#FF4D4D</CssParameter>
<CssParameter name="fill-opacity">0.7</CssParameter>
</Fill>
</PolygonSymbolizer>
</Rule>
<Rule>
<Title>> 4M</Title>
<!-- like a linesymbolizer but with a fill too -->
<ogc:Filter>
<ogc:PropertyIsGreaterThan>
<ogc:PropertyName>PERSONS</ogc:PropertyName>
<ogc:Literal>4000000</ogc:Literal>
</ogc:PropertyIsGreaterThan>
</ogc:Filter>
<PolygonSymbolizer>
<Fill>
<!-- CssParameters allowed are fill (the color) and fill-opacity -->
<CssParameter name="fill">#4D4DFF</CssParameter>
<CssParameter name="fill-opacity">0.7</CssParameter>
</Fill>
</PolygonSymbolizer>
</Rule>
<Rule>
<Title>Boundary</Title>
<LineSymbolizer>
<Stroke>
<CssParameter name="stroke-width">0.2</CssParameter>
</Stroke>
</LineSymbolizer>
<TextSymbolizer>
<Label>
<ogc:PropertyName>STATE_ABBR</ogc:PropertyName>
</Label>
<Font>
<CssParameter name="font-family">Times New Roman</CssParameter>
<CssParameter name="font-style">Normal</CssParameter>
<CssParameter name="font-size">14</CssParameter>
</Font>
<LabelPlacement>
<PointPlacement>
<AnchorPoint>
<AnchorPointX>0.5</AnchorPointX>
<AnchorPointY>0.5</AnchorPointY>
</AnchorPoint>
</PointPlacement>
</LabelPlacement>
</TextSymbolizer>
</Rule>
</FeatureTypeStyle>
</UserStyle>
</NamedLayer>
</StyledLayerDescriptor>
现在,让我们从完成相同任务的 CSS 文件开始。
首先,进入样式页面,点击 add a new style 链接来开始新样式。在“新样式”页面中,执行以下操作:
* 将新样式命名为任何您喜欢的名称,例如 ``csstutorial``
* 选择 ``CSS``格式
* 在 :guilabel:`Generate a default style` 下拉菜单中选择 ``Polygon`` 然后点击 :guilabel:`Generate...`
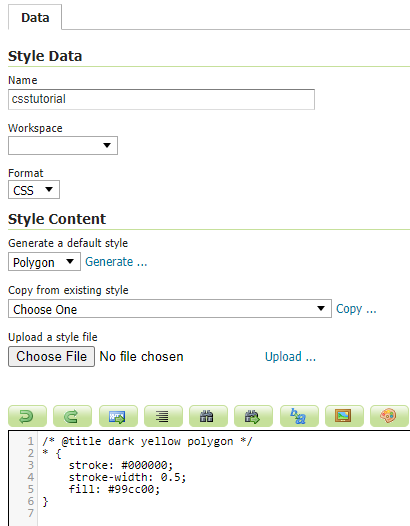
Creating a new CSS style
这样就创建了一个示例样式,其源代码与此类似(颜色可能不同)
/* @title cyan polygon */
* {
    stroke: #000000;
    stroke-width: 0.5;
    fill: #0099cc;
}
这展示了 CSS 样式的基本元素:
一个 选择器 ,用于标识要样式化的部分数据。这里,选择器是 *, 表示所有数据都应该使用样式属性。
在花括号({})内的 属性 指定受影响的特性应该如何样式化。属性由用冒号(:)分隔的名称/值对组成。
我们也可以看到基本的样式一个多边形(fill),和它的轮廓((stroke)。
See also
Filter syntax 和 Property listing 列表页面提供了有关 CSS 样式中可用选项的更多信息。
在继续之前,让我们保存样式并在状态层预览它:
点击“应用”保存图层,并启用样式预览
现在在“样式编辑器页面”,切换到“图层预览”标签,点击“预览图层”链接,然后在对话框中选择“状态”图层
样式编辑器现在应该显示状态层填充和描边
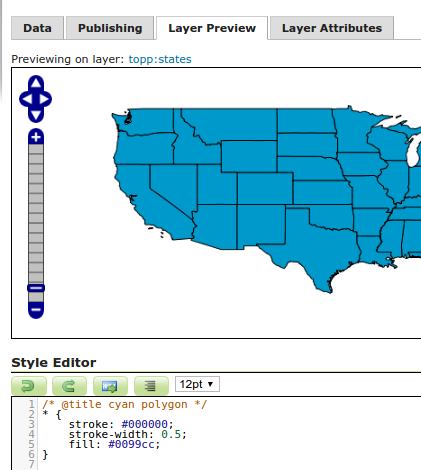
Previewing the CSS style with the state layer
让我们使用这些基础知识开始转换状态样式。SLD的第一条规则适用于 PERSONS 字段小于200万的州:
<Rule>
<Title>< 2M</Title>
<ogc:Filter>
<ogc:PropertyIsLessThan>
<ogc:PropertyName>PERSONS</ogc:PropertyName>
<ogc:Literal>2000000</ogc:Literal>
</ogc:PropertyIsLessThan>
</ogc:Filter>
<PolygonSymbolizer>
<Fill>
<!-- CssParameters allowed are fill (the color) and fill-opacity -->
<CssParameter name="fill">#4DFF4D</CssParameter>
<CssParameter name="fill-opacity">0.7</CssParameter>
</Fill>
</PolygonSymbolizer>
</Rule>
使用基于 CQL 的选择器,并复制 csparameters 的名称和值,我们得到:
[PERSONS < 2000000] {
  fill: #4DFF4D;
  fill-opacity: 0.7;
}
对于第二种样式,我们有一个 PropertyIsBetween 过滤器,它不直接转换为 CSS
<Rule>
  <Title>2M - 4M</Title>
  <ogc:Filter>
    <ogc:PropertyIsBetween>
      <ogc:PropertyName>PERSONS</ogc:PropertyName>
      <ogc:LowerBoundary>
        <ogc:Literal>2000000</ogc:Literal>
      </ogc:LowerBoundary>
      <ogc:UpperBoundary>
        <ogc:Literal>4000000</ogc:Literal>
      </ogc:UpperBoundary>
    </ogc:PropertyIsBetween>
  </ogc:Filter>
  <PolygonSymbolizer>
     <Fill>
        <!-- CssParameters allowed are fill (the color) and fill-opacity -->
        <CssParameter name="fill">#FF4D4D</CssParameter>
        <CssParameter name="fill-opacity">0.7</CssParameter>
     </Fill>
  </PolygonSymbolizer>
</Rule>
但是,PropertyIsBetween 可以很容易地被两个比较选择器的组合取代。在 CSS 中,您可以简单地将多个选择器一个接一个地放置到一个规则上。只有空格分隔的选择器必须全部满足才能应用样式。通过逗号 (,)分隔,可以将多个这样的组附加到一个规则。如果一个特性匹配规则的任何逗号分隔组,则应用该样式。因此 CSS 的第二条等价规则是:
[PERSONS >= 2000000] [PERSONS < 4000000] {
  fill: #FF4D4D;
  fill-opacity: 0.7;
}
第三条规则的处理方式与第一条基本相同:
[PERSONS >= 4000000] {
  fill: #4D4DFF;
  fill-opacity: 0.7;
}
第四条也是最后一条规则有点不同。它适用于所有州的标签和大纲:
<Rule>
  <Title>Boundary</Title>
  <LineSymbolizer>
    <Stroke>
      <CssParameter name="stroke-width">0.2</CssParameter>
    </Stroke>
  </LineSymbolizer>
  <TextSymbolizer>
    <Label>
      <ogc:PropertyName>STATE_ABBR</ogc:PropertyName>
    </Label>
    <Font>
      <CssParameter name="font-family">Times New Roman</CssParameter>
      <CssParameter name="font-style">Normal</CssParameter>
      <CssParameter name="font-size">14</CssParameter>
    </Font>
    <LabelPlacement>
      <PointPlacement>
        <AnchorPoint>
          <AnchorPointX>0.5</AnchorPointX>
          <AnchorPointY>0.5</AnchorPointY>
        </AnchorPoint>
      </PointPlacement>
    </LabelPlacement>
  </TextSymbolizer>
</Rule>
与迄今为止的所有规则不同,这引入了将提取的值 (STATE_ABBR) 直接渲染到地图中的想法。为此,您可以将包裹在方形括号 ([]) 中的CQL表达式用作 CSS 属性的值。 还有必要将包含空格的值,如 Times New Roman, 用单引号或双引号 (", ')括起来。考虑到这些细节,让我们来编写规则:
* {
  stroke-width: 0.2;
  label: [STATE_ABBR];
  label-anchor: 0.5 0.5;
  font-family: "Times New Roman";
  font-fill: black;
  font-style: normal;
  font-size: 14;
}
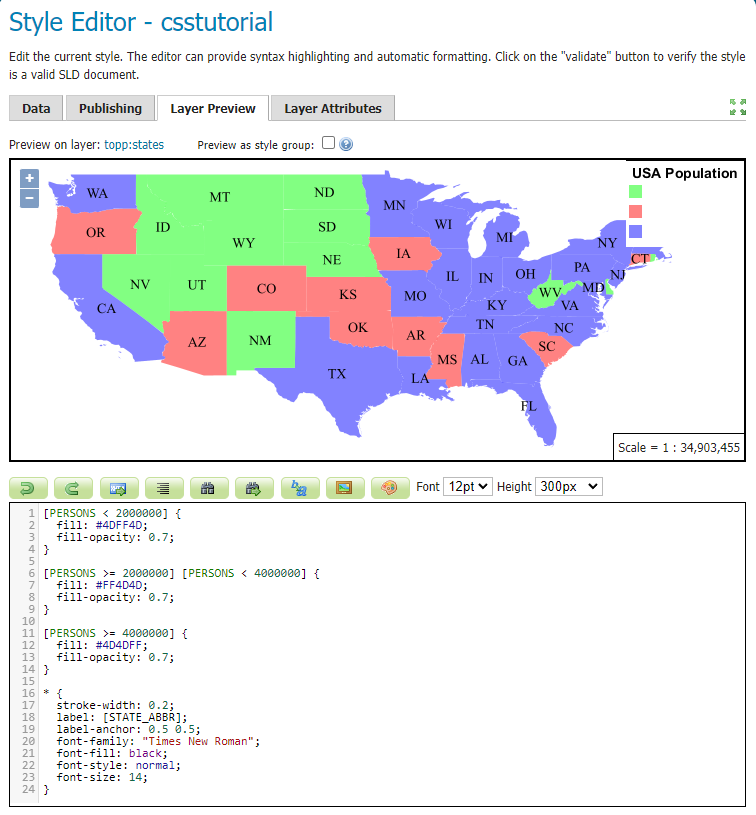
综上所述,您现在应该有一个看起来像:
[PERSONS < 2000000] {
  fill: #4DFF4D;
  fill-opacity: 0.7;
}

[PERSONS >= 2000000] [PERSONS < 4000000] {
  fill: #FF4D4D;
  fill-opacity: 0.7;
}

[PERSONS >= 4000000] {
  fill: #4D4DFF;
  fill-opacity: 0.7;
}

* {
  stroke-width: 0.2;
  label: [STATE_ABBR];
  label-anchor: 0.5 0.5;
  font-family: "Times New Roman";
  font-fill: black;
  font-style: normal;
  font-size: 14;
}
单击表单底部的 Apply 按钮以保存更改。
CSS style applied to the states layer
你会发现边界消失了!在 GeoServer CSS 模块中,每种类型的符号都有一个“ key ”属性来控制是否应用它。没有这些“ key ”属性,下级属性将被忽略。这些“ key ”属性是:
fill, 它控制是否应用多边形填充。这指定了用于填充的颜色或图形。
stroke, 控制是否应用线条和多边形轮廓线。它指定笔画的颜色(或图形填充)。
mark, 它控制是否绘制点标记。这标识了要使用的已知标记或图像URL。
label, 它控制是否在地图上绘制标签。这标识用于标记映射的文本,通常作为 CQL 表达式。
halo-radius, 它控制是否在标签周围绘制光环。这将指定此类光晕的大小。
See also
Property listing 页以获取有关其他属性的信息。
因为我们没有指定 stroke 颜色,所以没有应用描边。让我们添加它,取代最终的规则,使它现在看起来像这样
* {
  stroke: black;
  stroke-width: 0.2;
  label: [STATE_ABBR];
  label-anchor: 0.5 0.5;
  font-family: "Times New Roman";
  font-fill: black;
  font-style: normal;
  font-size: 14;
}
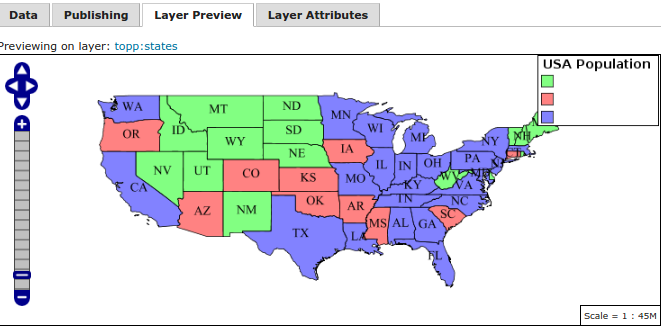
Border added to style
改进风格
移除重复的属性
我们现在拥有的样式只有 23 行,相对于最初的 103 行 XML 来说,这是一个很好的改进。然而,我们仍然到处重复 fill-opacity 属性。
我们可以将其移动到 * 规则中,并将其应用于任何地方。这是可行的,因为 GeoServer CSS 模块模拟了 级联 :而SLD使用了一个“ 画家模型 ”,其中每个规则都是独立处理的,级联样式允许你提供一般样式属性,只覆盖特定功能的特定属性。
这将样式减少到只有 21 行:
[PERSONS < 2000000] {
  fill: #4DFF4D;
}

[PERSONS > 2000000] [PERSONS < 4000000] {
  fill: #FF4D4D;
}

[PERSONS > 4000000] {
  fill: #4D4DFF;
}

* {
  fill-opacity: 0.7;
  stroke-width: 0.2;
  label: [STATE_ABBR];
  label-anchor: 0.5 0.5;
  font-family: "Times New Roman";
  font-fill: black;
  font-style: normal;
  font-size: 14;
}
比例相关样式
这种风格的标签很好,但在较低的缩放级别,它们似乎有点拥挤。我们可以很容易地将标签移动到一个规则,直到刻度分母低于 2000000 才会激活。 我们确实希望在所有缩放级别上保持 stroke 和不透明度填充,以便将它们与标签属性分开。
在main (*) 规则中保持以下属性:
* {
  fill-opacity: 0.7;
  stroke-width: 0.2;
}
移除所有其他的,将它们移动到一个新规则中:
[@sd < 20M] {
  label: [STATE_ABBR];
  label-anchor: 0.5 0.5;
  font-family: "Times New Roman";
  font-fill: black;
  font-style: normal;
  font-size: 14;
}
为图例设置标题
到目前为止,我们还没有为任何样式规则设置标题。这实际上不会在查看地图时造成任何问题,但 GeoServer 会在自动生成图例图形时使用标题。如果没有标题, GeoServer 会依赖于名称,而在 CSS 模块中,名称是根据每个规则的过滤器生成的。 标题通常不是 CSS 的一部分,所以 GeoServer 会在每个规则之前的特殊格式注释中查找它们。我们可以添加这样的标题:
/* @title Population < 2M */
[PERSONS < 2000000] {

  ...

/* @title 2M < Population < 4M */
[PERSONS > 2000000] [PERSONS < 4000000] {

  ...

/* @title Population > 4M */
[PERSONS > 4000000] {

  ...


/* @title Boundaries */
* {

  ...
由于 CSS 转换为 SLD 的方式,每个 SLD 规则都是若干 CSS 规则的组合。这是通过将标题与单词 “with” 结合起来处理的。如果规则的标题被省略,那么 SLD 输出中就不包括它。
最终的CSS应该是这样的:
/* @title Population < 2M */
[PERSONS < 2000000] {
  fill: #4DFF4D;
  fill-opacity: 0.7;
}

/* @title 2M < Population < 4M */
[PERSONS >= 2000000] [PERSONS < 4000000] {
  fill: #FF4D4D;
  fill-opacity: 0.7;
}

/* @title Population > 4M */
[PERSONS >= 4000000] {
  fill: #4D4DFF;
  fill-opacity: 0.7;
}


/* @title Boundaries */
* {
  stroke: black;
  stroke-width: 0.2;
  fill-opacity: 0.7;
}

[@sd < 20M] {
  label: [STATE_ABBR];
  label-anchor: 0.5 0.5;
  font-family: "Times New Roman";
  font-fill: black;
  font-style: normal;
  font-size: 14;
}

Final style with rule names
应用规则嵌套
作为最后一种变体,可以通过利用规则嵌套使样式更紧凑:
* {
  stroke: black;
  stroke-width: 0.2;
  fill-opacity: 0.7;

  /* @title Population < 2M */
  [PERSONS < 2000000] {
    fill: #4DFF4D;
  };
  /* @title 2M < Population < 4M */
  [PERSONS >= 2000000] [PERSONS < 4000000] {
    fill: #FF4D4D;
  };
  /* @title Population > 4M */
  [PERSONS >= 4000000] {
    fill: #4D4DFF;
  };

  /* Labelling */
  [@sd < 20M] {
    label: [STATE_ABBR];
    label-anchor: 0.5 0.5;
    font-family: "Times New Roman";
    font-fill: black;
    font-style: normal;
    font-size: 14;
  }
}
CSS 工作室
更多详细信息, 请访问下一部分, CSS workshop。 该研讨会过去曾教授 CSS 扩展并被采用于课程设置,现已移植到用户文档中。